Water transfer printing: Difference between revisions
Citation bot (talk | contribs) Removed parameters. | You can use this bot yourself. Report bugs here. | Suggested by Abductive | Category:Japanese inventions | via #UCB_Category 260/388 |
Ikonicswiki (talk | contribs) →Process: Added photos of process and update information about hydrodip water tank temperature, dwelling time, and tips on flame treating. |
||
| Line 31: | Line 31: | ||
==Process== |
==Process== |
||
In the process, the substrate piece to be printed first goes through the entire painting process: surface preparation, priming, painting, and clear coating.<ref>{{Cite web|url=http://www.liquidprintone.com/process.php|title=FAQ {{!}} Liquid Print - Water Transfer Printing|website=www.liquidprintone.com|access-date=2016-05-27}}</ref> |
In the process, the substrate piece to be printed first goes through the entire painting process: surface preparation, priming, painting, and clear coating.<ref>{{Cite web|url=http://www.liquidprintone.com/process.php|title=FAQ {{!}} Liquid Print - Water Transfer Printing|website=www.liquidprintone.com|access-date=2016-05-27}}</ref> Depending on some types of plastics, some substrates may also need to be flame treated before a base coat is applied. A PVA hydrographic film, which has been printed on with a desired graphic image using latex or pigment-based inks, is carefully placed on the water's surface in the dipping tank. Recommended water temperature for the dip tank is 90° F (32° C).The clear hydrographic film is water-soluble and should dwell on top of the water for 60-75 seconds before spraying with activator solution. Safely using a fitted respirator, the film is then sprayed with an activator solution to dissolve the film and return it to its fluid state. Using a dipping is begun, the surface tension of the water will allow the pattern to curve around any shape.<ref>{{Cite web|date=February 3, 2021|title=Hydrokon PVA Film User Guide|url=https://hydrokon.com/content/2021_Hydrokon_User_Guide.pdf|url-status=live|website=[[Hydrokon Water Transfer Film]]|publisher=[[IKONICS Corporation]]}}</ref> Any remaining residue is then rinsed off thoroughly. The ink adheres to the desired surface and it cannot be washed off easily. It is then allowed to dry.<ref>{{Cite web|url=http://www.liquidprintone.com/process.php|title=How To Hydrographics {{!}} Learn the Water Transfer Printing Process {{!}} Liquid Print|website=www.liquidprintone.com|access-date=2016-05-27}}</ref> |
||
The adhesion is a result of the chemical components of the activator softening the base coat layer and allowing the ink to form a bond with it. One of the most common causes of a failure to achieve adhesion between the two layers is a poorly applied activator. This can be either too much activator being applied or too little.<ref>{{cite web|url=http://turbo.discovery.com/beyond/index.html?playerId=245988601&categoryId=255529042&lineupId=1373280940&titleId=1370859138 |title=American Chopper 5: Camo Bike : Video : Discovery Channel |publisher=Turbo.discovery.com |date=2010-12-06 |accessdate=2011-11-14 |url-status=bot: unknown |archiveurl=https://web.archive.org/web/20090411123033/http://turbo.discovery.com/beyond/index.html?playerId=245988601&categoryId=255529042&lineupId=1373280940&titleId=1370859138 |archivedate=2009-04-11 }}</ref> |
The adhesion is a result of the chemical components of the activator softening the base coat layer and allowing the ink to form a bond with it. One of the most common causes of a failure to achieve adhesion between the two layers is a poorly applied activator. This can be either too much activator being applied or too little.<ref>{{cite web|url=http://turbo.discovery.com/beyond/index.html?playerId=245988601&categoryId=255529042&lineupId=1373280940&titleId=1370859138 |title=American Chopper 5: Camo Bike : Video : Discovery Channel |publisher=Turbo.discovery.com |date=2010-12-06 |accessdate=2011-11-14 |url-status=bot: unknown |archiveurl=https://web.archive.org/web/20090411123033/http://turbo.discovery.com/beyond/index.html?playerId=245988601&categoryId=255529042&lineupId=1373280940&titleId=1370859138 |archivedate=2009-04-11 }}</ref> |
||
[[File:Cradling Hydrographic Film.jpg|left|thumb|500x500px|Before laying the hydrographic film on top of the water's surface, it works best to cradle the film roll one corner slowly and smoothly onto the water to the other corner. Avoid getting any air bubbles under the film.<ref>Hydrokon, trademarked product of IKONICS Corporation, 2021</ref>]] |
|||
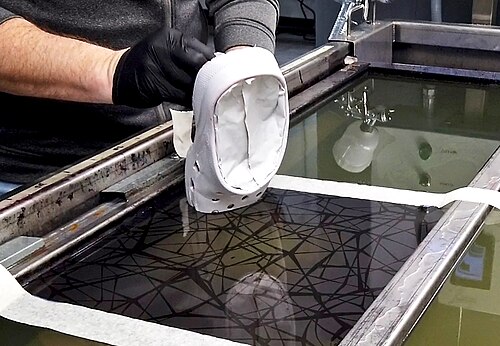
[[File:Hydro Dipping Technique.jpg|center|thumb|500x500px|A substrate should typically be dipped at about a 45° angle.<ref>{{Cite web|last=Hernesman|first=Mikaela|date=March 23, 2021|title=10 Steps to Customize Crocs with Hydrokon|url=https://hydrokon.com/blog/10-steps-to-customize-crocs-with-hydrokon/|url-status=live|website=[[Hydrokon]]}}</ref>]] |
|||
==See also== |
==See also== |
||
Revision as of 16:52, 23 July 2021

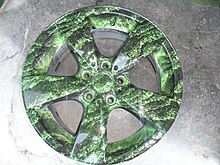
Water transfer printing, also known as immersion printing, water transfer imaging, hydro dipping, watermarbling, cubic printing, Hydrographics, or HydroGraphics, is a method of applying printed designs to three-dimensional surfaces. The resulting combinations may be considered decorative art or applied art. The hydrographic process can be used on metal, plastic, glass, hard woods, and various other materials.[1]
History
The exact origin of the water transfer printing process is unclear. However, the first hydrographic apparatus registered for a US patent was by Motoyasu Nakanishi of Cubic Engineering KK on July 26, 1982. Its abstract reads, "[a] printing apparatus provided with a structure which supplies a transcription film into a transcription tub containing a liquid so that the transcription film is kept afloat on the liquid, a structure which makes the liquid flow in a direction in which the film is supplied, and a structure which slantingly immerses an article to be printed into the liquid in the transcription tub from an upstream position to a downstream position of the liquid."[2]
Usage
The water transfer printing process is extensively used to decorate items that range from entire all-terrain vehicles and car dashboards, to small items like bike helmets or other automotive trim. Films can be applied to all types of substrates including plastic, fiberglass, wood, ceramics, and metal. For the most part, if the item can be dipped in water and can be painted using traditional techniques then the hydrographic printing process can be used.[3]
Process
In the process, the substrate piece to be printed first goes through the entire painting process: surface preparation, priming, painting, and clear coating.[4] Depending on some types of plastics, some substrates may also need to be flame treated before a base coat is applied. A PVA hydrographic film, which has been printed on with a desired graphic image using latex or pigment-based inks, is carefully placed on the water's surface in the dipping tank. Recommended water temperature for the dip tank is 90° F (32° C).The clear hydrographic film is water-soluble and should dwell on top of the water for 60-75 seconds before spraying with activator solution. Safely using a fitted respirator, the film is then sprayed with an activator solution to dissolve the film and return it to its fluid state. Using a dipping is begun, the surface tension of the water will allow the pattern to curve around any shape.[5] Any remaining residue is then rinsed off thoroughly. The ink adheres to the desired surface and it cannot be washed off easily. It is then allowed to dry.[6]
The adhesion is a result of the chemical components of the activator softening the base coat layer and allowing the ink to form a bond with it. One of the most common causes of a failure to achieve adhesion between the two layers is a poorly applied activator. This can be either too much activator being applied or too little.[7]


See also
References
- ^ Cuffaro, Dan; Zaksenberg, Isaac (2013). The Industrial Design Reference & Specification Book. Rockport Publishers. p. 50. ISBN 9781592538478.
- ^ "The Origin of Hydro-Dipping". Dip Junkies. Retrieved 2015-03-01.
- ^ "Water Transfer Printing FAQ's". Frequently Asked Questions. TWN Industries. Retrieved 2017-04-23.
- ^ "FAQ | Liquid Print - Water Transfer Printing". www.liquidprintone.com. Retrieved 2016-05-27.
- ^ "Hydrokon PVA Film User Guide" (PDF). Hydrokon Water Transfer Film. IKONICS Corporation. February 3, 2021.
{{cite web}}: CS1 maint: url-status (link) - ^ "How To Hydrographics | Learn the Water Transfer Printing Process | Liquid Print". www.liquidprintone.com. Retrieved 2016-05-27.
- ^ "American Chopper 5: Camo Bike : Video : Discovery Channel". Turbo.discovery.com. 2010-12-06. Archived from the original on 2009-04-11. Retrieved 2011-11-14.
{{cite web}}: CS1 maint: bot: original URL status unknown (link) - ^ Hydrokon, trademarked product of IKONICS Corporation, 2021
- ^ Hernesman, Mikaela (March 23, 2021). "10 Steps to Customize Crocs with Hydrokon". Hydrokon.
{{cite web}}: CS1 maint: url-status (link)
