Bead probe technology: Difference between revisions
m →Description: Typo fixing hyphen(s), replaced: spring loaded → spring-loaded using AWB (7852) |
m ISBNs (Build KE) |
||
| Line 1: | Line 1: | ||
[[ |
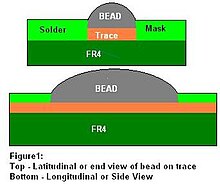
[[File:BEAD PROBE.JPG|thumb|right|Side and end view showing a solder bead providing access to a trace located under the solder mask]] |
||
'''Bead probe technology''' (BPT) is technique used to provide electrical access (called “nodal access”) to [[printed circuit board]] (PCB) circuitry for performing [[In-circuit test| in-circuit testing (ICT)]].<ref> http://www.home.agilent.com/agilent/editorial.jspx?action=download&cc=US&lc=eng&ckey=873640&id=873640 </ref ><ref> http://www.agilent.com/see/beadprobe</ref> It makes use of small beads of [[solder]] placed onto the board's [[Printed circuit board#Patterning (etching)|trace]]s to allow measuring and controlling of the signals using a test probe. This permits test access to boards on which standard ICT test pads are not feasible due to space constraints. |
'''Bead probe technology''' (BPT) is technique used to provide electrical access (called “nodal access”) to [[printed circuit board]] (PCB) circuitry for performing [[In-circuit test| in-circuit testing (ICT)]].<ref> http://www.home.agilent.com/agilent/editorial.jspx?action=download&cc=US&lc=eng&ckey=873640&id=873640 </ref ><ref> http://www.agilent.com/see/beadprobe</ref> It makes use of small beads of [[solder]] placed onto the board's [[Printed circuit board#Patterning (etching)|trace]]s to allow measuring and controlling of the signals using a test probe. This permits test access to boards on which standard ICT test pads are not feasible due to space constraints. |
||
==Description== |
==Description== |
||
Bead probe technology is a probing method used to connect electronic test equipment to the [[device under test]] (DUT) within a [[In-circuit test#Bed of nails tester|bed of nails fixture]]. The technique was first used in the 1990s<ref>Surface Mount & Mixed Technology PCB Design Guidelines by David Boswell. Page 28 ISBN |
Bead probe technology is a probing method used to connect electronic test equipment to the [[device under test]] (DUT) within a [[In-circuit test#Bed of nails tester|bed of nails fixture]]. The technique was first used in the 1990s<ref>Surface Mount & Mixed Technology PCB Design Guidelines by David Boswell. Page 28 ISBN 1-872422-01-2</ref> and originally given the name “Waygood Bump” after one of the main proponents, Rex Waygood. They are also commonly referred to as solder bumps.<ref>Surface Mount Technology – Principles and Practices 2nd Edition by Ray. P Prasad Page 332 ISBN 0-412-12921-3 </ref> Bead probes were designed for when less than 30 [[Thou_(length)|mil]] is available for test probe points on the PCB. They are used with standard ICT spring-loaded [[test probe# Pogo pins|test probe]]s to connect the test equipment to the DUT. |
||
[[ |
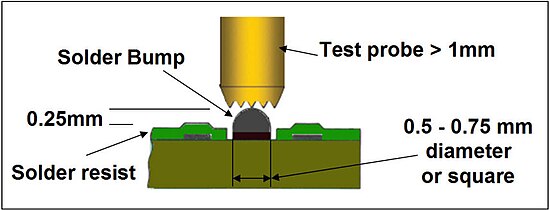
[[File:waygood.jpg|thumb|center|550px|Side view of a PCB showing a solder bead and test probe.]] |
||
==Bead construction== |
==Bead construction== |
||
Bead probes are made from a very small "beads" of solder that fit atop of the PCB traces. They are manufactured using the same techniques as other solder features. Construction requires a hole to be opened in the [[solder mask]], exposing the copper trace. This hole is sized to precisely control the amount of metal that forms the bead. [[Solder paste]] is applied to the location and [[Reflow soldering|reflowed]]. During reflow, solder flows and is drawn to the copper trace. Surface tension causes the bead to have a curved surface and rise above the solder mask, where it solidifies into a Bead Probe. The bead will be roughly [[wiktionary:obround|obround]] in shape and may be 15-25 mils long. A properly constructed bead is the same width as the trace and just enough to clear the surrounding solder mask. The bead is then accessible for testing using a probe with a flat end, which can help compensate for the tolerance build up in the test fixture and PCB. |
Bead probes are made from a very small "beads" of solder that fit atop of the PCB traces. They are manufactured using the same techniques as other solder features. Construction requires a hole to be opened in the [[solder mask]], exposing the copper trace. This hole is sized to precisely control the amount of metal that forms the bead. [[Solder paste]] is applied to the location and [[Reflow soldering|reflowed]]. During reflow, solder flows and is drawn to the copper trace. Surface tension causes the bead to have a curved surface and rise above the solder mask, where it solidifies into a Bead Probe. The bead will be roughly [[wiktionary:obround|obround]] in shape and may be 15-25 mils long. A properly constructed bead is the same width as the trace and just enough to clear the surrounding solder mask. The bead is then accessible for testing using a probe with a flat end, which can help compensate for the tolerance build up in the test fixture and PCB. |
||
[[ |
[[File:Typical Bead Probe 01.JPG|thumb|center|550px|alt=Top and angled view photographs of solder beads|Typical bead probes formed after [[Reflow soldering|reflow]] and then probed successfully]] |
||
==Advantages== |
==Advantages== |
||
Revision as of 08:25, 8 May 2012

Bead probe technology (BPT) is technique used to provide electrical access (called “nodal access”) to printed circuit board (PCB) circuitry for performing in-circuit testing (ICT).[1][2] It makes use of small beads of solder placed onto the board's traces to allow measuring and controlling of the signals using a test probe. This permits test access to boards on which standard ICT test pads are not feasible due to space constraints.
Description
Bead probe technology is a probing method used to connect electronic test equipment to the device under test (DUT) within a bed of nails fixture. The technique was first used in the 1990s[3] and originally given the name “Waygood Bump” after one of the main proponents, Rex Waygood. They are also commonly referred to as solder bumps.[4] Bead probes were designed for when less than 30 mil is available for test probe points on the PCB. They are used with standard ICT spring-loaded test probes to connect the test equipment to the DUT.

Bead construction
Bead probes are made from a very small "beads" of solder that fit atop of the PCB traces. They are manufactured using the same techniques as other solder features. Construction requires a hole to be opened in the solder mask, exposing the copper trace. This hole is sized to precisely control the amount of metal that forms the bead. Solder paste is applied to the location and reflowed. During reflow, solder flows and is drawn to the copper trace. Surface tension causes the bead to have a curved surface and rise above the solder mask, where it solidifies into a Bead Probe. The bead will be roughly obround in shape and may be 15-25 mils long. A properly constructed bead is the same width as the trace and just enough to clear the surrounding solder mask. The bead is then accessible for testing using a probe with a flat end, which can help compensate for the tolerance build up in the test fixture and PCB.
Advantages
Bead probe can be used in circuits where the pin-pitch is too fine to allow standard test pads. This is becoming more common as pin pitches continue to reduce, particularly in embedded devices. Typically bead probe widths are the width of the PCB traces with a length of about three times this. This allows a high degree of flexibility in their positioning, and can in some cases be applied retrospectively to existing layouts. Because of their small size, bead probes do not affect the signal quality of the signals transferring within the PCB trace.[5][6] This is especially useful in high speed input/output (HSIO) interconnects, where a standard test pad would interfere with the signal.
Disadvantages
- The soldering process that forms the bead probe leaves a coating of flux. Depending on the manufacturing process used, this flux can have varying levels of hardness. Flux with a waxy hardness can reduce the deformation force from the bead, preventing proper contact with the test probe during the first pass contact. This becomes less of an issue on subsequent contacts as the flux is displaced. Test probes with serrated ends of an appropriate size can also aid in measuring bead probes where flux is an issue.
- Bead probes require the trace being tested to be located on the surface. This makes it unsuitable for testing high-density boards with many obscured or internal traces and buried vias.
Alternatives
- Boundary scan integrates test components into the integrated circuits (ICs) mounted on the board, giving the ability to read or drive the ICs' pins. This allows for testing of interconnects for which physical access is not an option, such as BGA components or signal routes sandwiched between plane layers. A boundary scan controller uses four or more dedicated pins on the board to control test cells serially and receive the measured values. It has the disadvantage of needing board infrastructure to support boundary scan.
- Test Access Component (TAC) uses a device such as a 0201 as a target for a large probe as in the solder bump examples. The advantage of this technique is that it provides two target points at each end of the package. The disadvantage of this technique is it can add process and cost to the PCB. [7]
- A technique has been described[8] which opens up windows in the solder mask to create test points located directly on PCB tracks. This technique uses a conductive rubber tipped probe to contact the test point which could have a conductive Hot Air Solder Levelling (HASL) finish.
References
- ^ http://www.home.agilent.com/agilent/editorial.jspx?action=download&cc=US&lc=eng&ckey=873640&id=873640
- ^ http://www.agilent.com/see/beadprobe
- ^ Surface Mount & Mixed Technology PCB Design Guidelines by David Boswell. Page 28 ISBN 1-872422-01-2
- ^ Surface Mount Technology – Principles and Practices 2nd Edition by Ray. P Prasad Page 332 ISBN 0-412-12921-3
- ^ A New Probing Technique for High-Speed/High-Density Printed Circuit Boards by Kenneth P. Parker of Agilent Technologies
- ^ Applying a New In-Circuit Probing Technique for High-Speed/High Density Printed Circuit Boards to a Real-Life Product by Chris Jacobsen and Kevin Wible of Agilent Technologies
- ^ TEST ACCESS COMPONENT FOR AUTOMATIC TESTING OF CIRCUIT ASSEMBLIES United States Patent Application 20100207651
- ^ VAUCHER, C., Analog/Digital Testing of Loaded Boards Without Dedicated Test Points, Proceedings of the International Test Conference, IEEE 1996, pp. 325-32.
- Implementation of Solder-bead Probing in High Volume Manufacturing by Madhavan (Mady) Doraiswamy and James J (JJ) Grealish of Intel Corporation
