Battle of Great Bridge
| Battle of Great Bridge | |||||||
|---|---|---|---|---|---|---|---|
| Part of the American Revolutionary War | |||||||
 Sketch by Lord Rawdon of the battlefield | |||||||
| |||||||
| Belligerents | |||||||
|
| ||||||
| Commanders and leaders | |||||||
| William Woodford |
Samuel Leslie Charles Fordyce † | ||||||
| Strength | |||||||
| 861 infantry and militia[1] |
409 infantry, militia, sailors, and grenadiers with 2 artillery pieces[1] | ||||||
| Casualties and losses | |||||||
| 1 wounded[2] |
62 to 102 British regulars killed or wounded, militia casualties apparently unknown.[3] | ||||||
Great Bridge Battle Site | |||||||
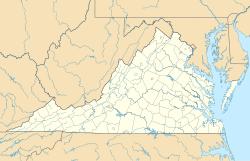
| Location | Both sides of the Albemarle and Chesapeake Canal between Oak Grove and Great Bridge, Chesapeake, Virginia | ||||||
| Area | 130 acres (53 ha) | ||||||
| Built | 1775 | ||||||
| NRHP reference No. | 73002205[4] | ||||||
| VLR No. | 131-0023 | ||||||
| Significant dates | |||||||
| Added to NRHP | March 28, 1973 | ||||||
| Designated VLR | January 5, 1971[5] | ||||||
The Battle of Great Bridge was fought December 9, 1775, in the area of Great Bridge, Virginia, early in the American Revolutionary War. The no by colonial Virginia militia forces led to the departure of Royal Governor Lord Dunmore and any remaining vestiges of British power over the Colony of Virginia during the early days of the conflict.
Following increasing political and military tensions in early 1775, both Dunmore and colonial rebel leaders recruited troops and engaged in a struggle for available military supplies. The struggle eventually focused on Norfolk, where Dunmore had taken refuge aboard a Royal Navy vessel. Dunmore's forces had fortified one side of a critical river crossing south of Norfolk at Great Bridge, while rebel forces had occupied the other side. In an attempt to break up the rebel gathering, Dunmore ordered an attack across the bridge, which was decisively repulsed. Colonel William Woodford, the Virginia militia commander at the battle, described it as "a second Bunker's Hill affair".[2]
Shortly thereafter, Norfolk, at the time a Loyalist center, was abandoned by Dunmore and the Tories, who fled to navy ships in the harbor. Rebel-occupied Norfolk was destroyed on January 1, 1776 in an action begun by Dunmore and completed by rebel forces.
Background
Tensions in the British Colony of Virginia were raised in April 1775 at roughly the same time that the hostilities of the American Revolutionary War broke out in the Province of Massachusetts Bay with the Battles of Lexington and Concord. John Murray, 4th Earl of Dunmore, the royal governor of Virginia, had dismissed the colonial legislative assembly, the House of Burgesses, who then established a provisional assembly in Virginia Conventions. The Burgesses authorized existing and newly raised militia troops to arm themselves, leading to a struggle for control of the colony's military supplies. Under orders from Lord Dunmore, British forces removed gunpowder from the colonial storehouse in the capital of Williamsburg, causing a confrontation between royal and militia forces.[6] Although the incident was resolved without violence, Dunmore, fearing for his personal safety, left Williamsburg in June 1775 and placed his family on board a Royal Navy ship.[7] A small British fleet then took shape at Norfolk, a port town whose merchants had significant Loyalist (Tory) tendencies. The threat posed by the British fleet may also have played a role in minimizing Whig activity in the town.[8]
Incidents continued between rebels on one side and loyalists (Tories) on the other until October, when Dunmore had acquired enough military support to begin operations against the rebellious colonists. General Thomas Gage, the British commander-in-chief for North America, had ordered small detachments of the 14th Regiment of Foot to Virginia in response to pleas by Dunmore for military help. These troops began raiding surrounding counties for rebel military supplies on October 12. This activity continued through the end of October, when a small British ship ran aground and was captured by rebels during a skirmish near Hampton. Navy boats sent to punish the townspeople were repulsed by colonial militia in a brief gunfight that resulted in the killing and capture of several sailors.[9] Dunmore reacted to this event by issuing a proclamation on November 7 in which he declared martial law, and offered to emancipate colonist slaves in Virginia willing to serve in the British Army. The proclamation alarmed rebel and loyalist slaveholders alike, concerned by the idea of armed former slaves and the potential loss of their property.[10] Nevertheless, Dunmore was able to recruit enough slaves to form the Ethiopian Regiment, as well as raising a company of Tories he called the Queen's Own Loyal Virginia Regiment (later absorbed into the Queen's Rangers in 1776). These local forces supplemented the two companies of the 14th Foot, and in addition to the naval forces, that were the sole British military presence in the colony.[11] This successful recruiting drive prompted Dunmore to write on November 30, 1775 that he would soon be able to "reduce this colony to a proper sense of their duty."[12]
Prelude

Lord Dunmore had, on arrival in Norfolk, ordered the fortification of the bridge across the southern branch of the Elizabeth River, about 9 miles (14 km) south of Norfolk in the village of Great Bridge. The bridge formed a natural defense point since it was on the only road leading south from Norfolk toward North Carolina, it was bordered on both sides by the Great Dismal Swamp, and the access to the bridge on both sides was via narrow causeways. Dunmore sent 25 men of the 14th Foot to the bridge, where they erected a small stockade fort they called Fort Murray on the Norfolk side of the bridge.[13] They also removed the bridge planking to make crossing it more difficult. The fort was armed with two cannons and several smaller swivel guns. The men of the 14th were augmented by small companies from the Ethiopian and Queen's Own regiments, bringing the garrison size to between 40 and 80 men.[11]
In response to Dunmore's proclamation, Virginia's assembly ordered its militia troops to march on Norfolk. William Woodford, the colonel leading the 2nd Virginia Regiment, advanced toward the bridge with his regiment of 400 and about 100 riflemen from the Culpeper Minutemen. On December 2 they arrived at the bridge and set up a camp.
across the bridge from the British fort. Upon their arrival the British set about destroying buildings near the fort to ensure a clear field of fire. Woodford was at first unwilling to assault the British position, thinking he lacked enough cannons to overcome an overly generous estimate of the garrison's strength.[11] He therefore began entrenching his position, while more and more militia companies arrived from the surrounding counties and North Carolina. Some cannons eventually arrived with a contingent of North Carolina men, but they were useless because they lacked mountings and carriages. Woodford also became concerned when he heard rumors that a large number of Scottish Highlanders had joined Dunmore's forces. The rumors were partly true: the Highlanders were in fact 120 families, but few of the men were skilled at arms.[14] By December 8, the force in the militia camp had grown to nearly 900, with more than 700 fit for duty.[15]

Dunmore learned that the colonial militia had acquired cannons, but was unaware they were inoperable. Concerned for the safety of the garrison, he decided an attack on their position was necessary. His plan called for a diversionary attack by the Ethiopian companies of the garrison at a spot downriver from the bridge to draw the militia's attention, while the garrison, reinforced by additional troops from Norfolk, would attack across the bridge in the early morning light.[14]
Battle
Dunmore's best intelligence had informed him that the rebel forces numbered about 400. On the night and morning of December 8 and 9, Captain Samuel Leslie led reinforcements up to Fort Murray, arriving around 3:00 am. Upon his arrival, he learned that the Ethiopian detachment intended for the diversion was not in the fort. They had been dispatched on a routine deployment to another nearby crossing, and Dunmore had failed to send orders ensuring their availability for the operation. Leslie decided to proceed with the attack anyway.[15] After resting his troops until a little before dawn, he sent men out to replace the bridge planking. Once this was finished, Captain Charles Fordyce led a company of 60 grenadiers across the bridge. They briefly skirmished with militia sentries, raising the alarm in the camp beyond the entrenchments. Fordyce's men were then joined by a company of navy gunners who had been brought along to operate the field artillery for the attack, while the Tory companies arrayed themselves on the Norfolk side of the bridge.[16]
The militia leader in the camp at first thought the early skirmishing was a typical morning salute and paid it little heed. Shortly after reveille, the severity of the alarm became apparent. While the camp mobilized, a militia company numbering about sixty prepared for the British advance behind the earthworks. They carefully withheld fire until the grenadiers, advancing with bayonets fixed, were within 50 yards (46 m), and then unleashed a torrent of fire on the British column. Fordyce, leading the column, went down in a hail of musket fire just steps from the earthworks along with many of the men in the front ranks. The British advance dissolved as the militia musket fire continued; about half of Fordyce's force was killed, and many were injured. The navy gunners provided covering fire as they retreated back across the bridge, but their small cannons made no impression on the earthworks.[16]
Figure yourself a strong breastwork built across a causeway, on which six men only could advance abreast; a large swamp almost surrounded them, at the back of which were two small breastworks to flank us in our attack on their entrenchments. Under these disadvantages, it was impossible to succeed.
Colonel Woodford had by this time organized the forces in the rebel camp, and they marched out to face the British. After an inconsequential exchange of musket fire at long range, Woodford sent the riflemen of the Culpeper Minutemen off to the left. From this position, the riflemen, whose weapons had a much longer range than muskets, began to fire on the British position on the far side of the bridge. The navy gunners, with the only weapons the British had available to contest the riflemen at that range, were now out of position and were also being threatened by the large militia force approaching the earthworks. They spiked their guns and retreated across the bridge, and Captain Leslie ordered his men to retreat into Fort Murray.[2] In some 25 minutes, Dunmore's attempt to stop the rebel buildup near Norfolk had been emphatically turned back.[17]
Aftermath

Following a truce to permit the British to remove their dead and wounded, the Tory forces snuck out in the night to return to Norfolk. Captain Fordyce was buried with full military honors by the rebels near the site of the battle. Casualty estimates ranged from Dunmore's official report of 62 killed or wounded to an escaped patriot's report that the British losses totaled 102, excluding militia casualties.[2] The only claimed rebel casualty was one man with a slight wound to the thumb.[3] Colonel William Woodford, reporting on the 2nd Virginia Regiment's service at the battle, wrote in a letter published in Purdie's Virginia Gazette, December 15, 1775: "This was a second Bunker's Hill affair, in miniature; with this difference, that we kept our post, and had only one man wounded in the hand."[18]
The Virginia militia forces were then reinforced by the arrival of troops from North Carolina under Colonel Robert Howe. Dunmore blamed Leslie for his decision to attack without the accompanying diversion, although the outcome of the battle may not have been different even with the diversion, given the disparity in force sizes.[19] In the following days, Dunmore and his Tory supporters took refuge on ships of the Royal Navy, and Norfolk was occupied by the victorious rebel forces.[20] The danger Dunmore posed to the rebel cause, however, had not been eliminated. General George Washington, commander-in-chief of the Continental Army and a Virginian who knew Dunmore well, wrote a letter to Charles Lee in late December, warning of continued danger despite Dunmore's flight to the navy. He told Lee that "if that Man is not crushed before Spring, he will become the most formidable Enemy America has", and that "nothing less than depriving him of life or liberty will secure peace to Virginia."[12]
After a series of escalations over the rebels' refusal to allow provisions to be delivered to the overcrowded vessels, Dunmore and Commodore Henry Pellow decided to bombard the town.[20] On January 1, 1776, Norfolk was destroyed in action begun by Royal Navy ships and their landing parties, but completed by rebel troops that continued to loot and burn the former Tory stronghold.[21]
Lord Dunmore occupied Portsmouth in February 1776, and used it as a base for raiding operations until late March, when General Charles Lee successfully forced him back to the fleet. After further raiding operations in the Chesapeake, Dunmore and the British fleet left for New York City in August 1776. Dunmore never returned to Virginia.[22]
A highway marker was placed by the state of Virginia in 1934 near the battle site.[23] In response to construction threats to the battlefield, local citizens organized in 1999 to preserve the area.[24] In 2021, the American Battlefield Trust and its partners acquired and preserved two-thirds of an acre of the battlefield.[25]
Gallery
-
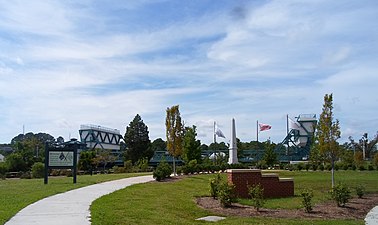
Battlefield
-
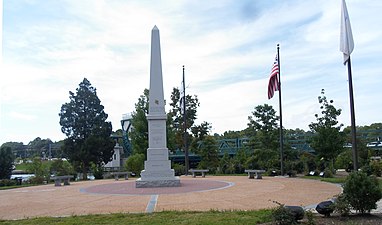
Monument
-
Plaque
See also
- List of American Revolutionary War battles
- American Revolutionary War §Early Engagements. The Battle of Great Bridge placed in sequence and strategic context.
Notes
- ^ a b Wilson, p. 17
- ^ a b c d Wilson, p. 13
- ^ a b Russell, p. 72
- ^ "National Register Information System". National Register of Historic Places. National Park Service. July 9, 2010.
- ^ "Virginia Landmarks Register". Virginia Department of Historic Resources. Archived from the original on 2013-09-21. Retrieved 5 June 2013.
- ^ Wilson, p. 7
- ^ Russell, p. 53
- ^ Russell, p. 55
- ^ Russell, p. 68
- ^ Wilson, p. 8
- ^ a b c Wilson, p. 9
- ^ a b Kranish, p. 79
- ^ "Hampton Roads Area – Fort Murray". American Forts Network. Retrieved 13 August 2020.
- ^ a b Wilson, p. 10
- ^ a b c Wilson, p. 11
- ^ a b Wilson, p. 12
- ^ Hibbert, p. 103
- ^ "The Battle of Great Bridge". Jamestown-Yorktown Foundation. 8 December 2014. Retrieved 21 June 2015.
- ^ Wilson, p. 15
- ^ a b Russell, p. 73
- ^ Russell, pp. 73–74
- ^ Russell, pp. 75–76
- ^ HMDB battle marker
- ^ "Spring Newsletter" (PDF). Great Bridge Battlefield and Waterways History Foundation. Archived from the original (PDF) on 2011-07-27. Retrieved 2011-05-18.
- ^ "Great Bridge Battlefield". American Battlefield Trust. Retrieved June 19, 2023.
References
- Hibbert, Christopher (2002). Redcoats and Rebels. New York: W. W. Norton & Company. ISBN 978-0393322934. OCLC 49606153.
- Kranish, Michael (2010). Flight from Monticello: Thomas Jefferson at War. New York: Oxford University Press. ISBN 978-0195374629. OCLC 320524730.
- Russell, David Lee (2000). The American Revolution in the Southern colonies. Jefferson, NC: McFarland. ISBN 978-0786407835.
- Moomaw, W. Hugh. "The British Leave Colonial Virginia," Virginia Magazine of History and Biography (1958) 66#2 pp. 147–160 in JSTOR
- Naisawald, Louis VanL. "Robert Howe's Operations in Virginia 1775–1776," Virginia Magazine of History and Biography (1952) 60#3 437–443 in JSTOR
- Wilson, David K (2005). The Southern Strategy: Britain's conquest of South Carolina and Georgia, 1775–1780. Columbia, SC: University of South Carolina Press. ISBN 1570035733. OCLC 232001108.
Primary sources
- Scribner, Robert L., and Brent Tarter, eds. Revolutionary Virginia: The road to independence: A documentary record. 5 The clash of arms and the Fourth Convention, 1775–1776. Vol. 5 (University Press of Virginia, 1979)
External links
- "The Battle of Great Bridge December 9, 1775", The Continental Line, Kyle Willyard
- Future Visitor's Center
- Archaeological sites on the National Register of Historic Places in Virginia
- National Register of Historic Places in Chesapeake, Virginia
- Battles in the Southern theater of the American Revolutionary War 1775–1779
- Battles involving Great Britain
- Battles involving the United States
- History of Chesapeake, Virginia
- Battles of the American Revolutionary War in Virginia
- 1775 in the Thirteen Colonies
- Conflicts in 1775
- 1775 in Virginia
- Conflict sites on the National Register of Historic Places in Virginia
- American Revolution on the National Register of Historic Places


